View all your vendors:
1. Log into Hubspot
2. Navigate to CRM -> Vendors using the left navigation bar

3. All your vendors will be displayed in the default view 'My Vendors'

Note: You can see a list of ALL vendors (irrespective of the Relationship Owner) in the tab titled 'All Vendors'
4. Validate the below and highlight any discrepancies to Brinda
| S.No | Description |
| 1 | Validate if the ownership is right (i.e. are you really the owner of the relationship? Can you pick up the responsibilities listed here?) |
| 2 |
Validate if there are missing vendors in the list - feel free to add any missing ones! (Remember that some vendors might be used across departments and someone else might be marked as the Relationship Owner. So, validate if the vendor is present under 'All Vendors' view) |
Validate Vendor Information
When viewing all vendors as per steps above, click on any vendor record to open the detailed view:

Validate and update (where necessary) the information present under 'Vendor Summary' in the left panel.
1. Vendor Status:
| Status | Meaning |
| Active | Vendor Services/Tools are currently used |
| Inactive |
Vendor whose services/platform used on an adhoc basis as and when required and there is no existing active contract. Example: Translation services or Consulting Services we use from time to time and pay per service without an annual contract, and is currently not in use |
| Terminated |
Vendor Services/Tools which are not used anymore Example: External training company used to deliver Powerpoint/Excel training in the past |
2. Contracting Entity = Servco or Insco
3. 'Vendor Primary Contact Name' & 'Vendor Primary Contact email'

Note: This is the one person you will reach out to for any key matters regarding the vendor relationship who might help with what is required directly or point you to the right person. Example: An Account Manager can always either help resolve a query or redirect to the right team/person for any query.
Add Vendor and Internal Contacts:
- Vendor contacts are all stakeholders from the vendor company who you work with for various tasks. Please make sure to include any person who can help with any vendor specific activity including monitored team mailboxes (e.g. billing@abc.com)
- Internal contacts are fellow Companjons who also work/interact with the vendor for various activities. They could be from your or other departments!
1. In the Vendor Detailed view -> right sidebar, click +Add in the Contacts card to add contact associations.

2. To create a new contact:
-
- Click the Create new tab.
- Enter First name, Last Name, email
- Provide details for the additional fields as specified below:
| Field | Value |
| Contact Type | Select 'Vendor' or 'Internal (Companjon) based on the type of contact you are adding |
| Key Contact Role | This is required only for vendor contacts. Type the designation of the contact (e.g. Account manager, Developer) |
| Key Contact Responsibilities | Select one or more responsibilities for the vendor contact based on what the person can help us with (e.g. Tech support, billing) |
| Status | Active |
| Legal basis for processing contact's data | Performance of Contract (or Not Applicable if we do not have a contract with the vendor i.e. they are a prospective vendor) |
-
- Click Create, or to create and associate another record, click Create and add another.
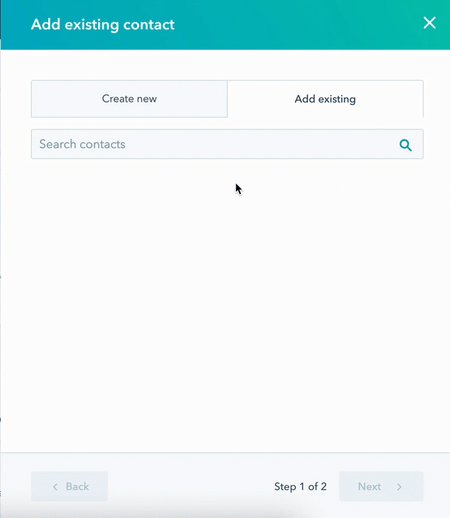
- To associate an existing contact:
- Search using the contact email
- Select the correct contact by checking the checkbox and click Save.

Once the contact is created/associated, you can see it in the right panel

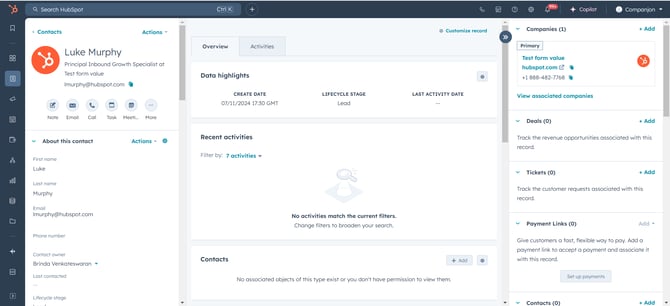
If you've updated the right values, you will see the contact listed under your vendor -> 'Vendor Contacts' or 'Companjon Contacts'.
Note: Only one contact is displayed by default, click on the name to switch and view others.
